Showing posts with label ART LESSONS. Show all posts

Monday, October 28, 2013

Line Shape Form Space Value COLOR... Color is our next element of Art by Texas Artist Laurie Pace

Line Shape Form Space Value Color 


"Colouring does not depend on where the colours are put, but on where the lights and darks are put, and all depends on form and outline, 
on where that is put. " (William Blake)


ThPumpkins began to bloom in the studio and it is now time for color.  Working in Acrylic, which is not the medium of choice for me for still life painting, I plunged ahead with student Lisa eagerly jumping into the challenge.


Both of the above are my pieces.

Remember last week, we began with just values using black and white. Now it is time to begin applying color.  I found it easier with the acrylics to do it layers letting some bleed through from below and you can watch as some change through the process.

This is Lisa at work and her progress with her pumpkins. She will be back tonight for more and we will be gearing up for TEXTURE! ( I really see a lot of texture in her current work.)


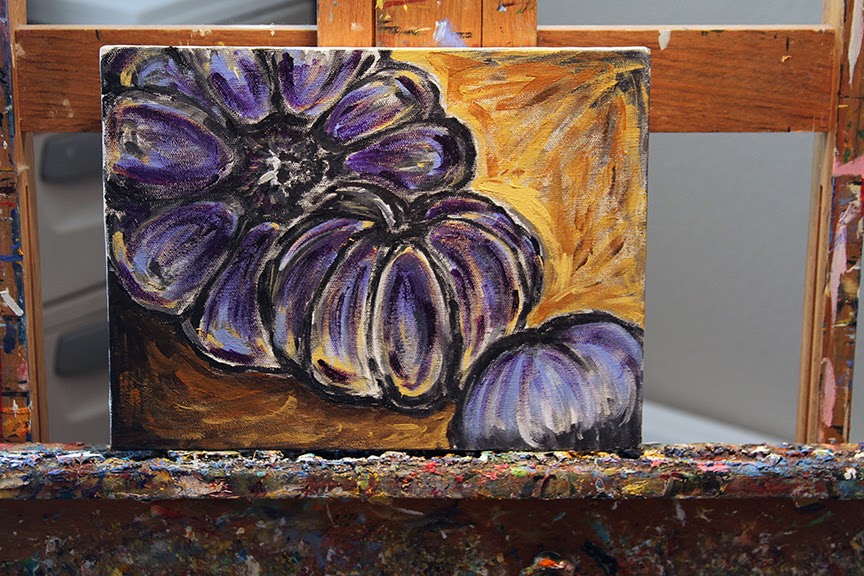
Here are my pumpkins as they are sitting right now. Some are finished, some are not. Some I am tempted to jump in with oils!


Hummm... what to do tonight with texture. Lisa and Sheryl are you ready?


Thank you again Rebecca Zook for your inspiration with values into paintings. 
Click here to see Rebecca's incredible work using this process in her paintings.


As surely as I valued your life today, so may the Lord value my life and deliver me from all trouble.”  1 Samuel 26:24  

Monday, October 7, 2013

Third Element of Art FORM by Texas Art Teacher Laurie Pace

Third Art Lesson
The Seven Elements of ART

Line, Shape, FORM


Form is usually the element my younger students love. Basically form is dimensional.  Form is a three-dimensional geometrical figure.  Where you normally have a circle, in form it is a sphere.  Where you have a square, in form you have a cube.  


My images shared will be from a simple project.  If you want to get fancy, do some carving, paper mache or anything that dimensionally builds shape. You can actually still do a two dimensional painting and use a palette knife and build up layers, and presto... you have form.  You can also do mixed media and have things pasted and gessoed onto the surface and that counts as form as well. 

Working with mixed media is always fun. Collaging and using different papers and objects to create art is very exciting.  Try and do some different types of art that allow you to use FORM.

I went into the studio to figure out something to share for an exercise besides carving a pumpkin or working with clay. Those are obvious Three Dimensional objects.  So how about mixing two D and three D?


First I chose colors...and decided to work with three together on the color wheel: Red, Yellow and Orange
Then I chose one opposite the Orange... which was a blue and I went with a teal type blue that had some green in it to balance the red.  Split Analogous Colors.

I rummaged around in my papers... and found these precut small watercolor papers.  I pulled out a bunch but after I grabbed a square canvas panel, I realized I only needed four. I still had no concept yet what I was going to do.

As I begin to paint the small pieces colors...like red on one side, orange on the other... I thought cool, I can paint the surface in squares. Originally my brain thought flat black, but I wanted this to build dimensionally with form, shape, line and this would do it.


See the black lines separating the shapes (Squares)?


Then I glued the square forms painting on two sides onto the surface two dimensional square.  Note that I matched up the fold to the color on the flat square. Another decision NOT pre-made but discovered as I worked.


 So simply put and made...  FORM....


This was only a small project... can you experiment this week with form? If nothing else, CARVE A PUMPKIN!

Monday, September 30, 2013

Second Element of ART... SHAPE, Lessons in Art by Texas Artist Laurie Pace

Lesson Two
Seven Elements of ART

SHAPE
( We have done Line and this week we are doing Shape.)


When contemplating shapes and all the many times I have taught shape to younger students, it consisted of drawings of three shapes and creating a composition with it.  

For the example I chose a rectangle, a circle and a triangle.  You can see there are endless combinations for those three objects, but the key is training your eye for composition and what really works with balance to the eye.  There are also other factors, is the surface a square, a rectangle horizontal or vertical?

Going a little bit further sharing some ideas that are more fun, and maybe this week I would have time to explore it too... is the idea of creating a mandala.  Originally Hinduism/Buddism, Mandalas have come down through the centuries as part of our art, with many parts filtering into all faiths.   

Painted 17th Century Tibetan "Five Deity Mandala


Wikipedia  http://en.wikipedia.org/wiki/Mandala

Mandala (Sanskrit: मण्डल Maṇḍala, 'circle') is a spiritual and ritual symbol in Hinduism and Buddhism, representing the Universe. The basic form of most mandalas is a square with four gates containing a circle with a center point. Each gate is in the general shape of a T.  Mandalas often exhibit radial balance.  The term is of Hindu origin. It appears in the Rig Veda as the name of the sections of the work, but is also used in other Indian religions, particularly Buddhism.   In various spiritual traditions, mandalas may be employed for focusing attention of aspirants and adepts, as a spiritual teaching tool, for establishing a sacred space, and as an aid to meditation and trance induction.  In common use, mandala has become a generic term for any plan, chart or geometric pattern that represents the cosmos metaphysically or symbolically; a microcosm of the universe.

Why Mandalas?  They use shape to create the art... reflecting shapes that leave balance to the soul and the eye.  

When I look at the Book of Hours, the Celtic cross (one is around my neck), the rosary, the halo, the crown of thorns, and rose windows.... you can find it crossing into the Christian faith by design.  See below....

In my art classes we study the Book of Hours for a six week period, delving into the history and the creation of our individual pages for our own Book of Hours, a prayer book.


You can see in the repeating shapes and design the similarities to the Mandalas using repeating shapes and patterns. 

As I mentioned, the Celtic Cross is another example of the designs used from the Mandalas, as well as the Rose Windows found in many Christian churches.


Why Mandalas?  They use shape to create the art... reflecting shapes that leave balance to the soul and the eye.  

So as you do your shape studies this week, you might want to try a Mandala.
I found this wonderful blog of Mandalas to color.  

http://coloringmandalas.blogspot.com/


I also found many samples on YouTube but my favorite was this one. Enjoy your week and think of all the different things to do with shape this week. Keep it simple and have fun.  


Monday, September 23, 2013

Contour Drawings, Element Line with Texas Artists Laurie Pace

CONTOUR DRAWING   Element of Art: Line
  © G.O.D. Laurie Justus Pace      Graphics One Design 2013

Thursday... it is Thursday right?

I decided today to try something different. I have zero idea if I can keep up with it or keep up with you, so let's give it a try.   I have taught workshops for a few years now, but my strength is teaching art.  Not just painting, but teaching art. I have taught art for over 35 years. Just typing this makes me feel old, but I truly have. I have taught in my studio all this time, did about 5 years in private school and probably 6 years in public school in Art.  Having you paint with me daily like other artists do is good, but strengthening your composition skills and sharpening your knowledge in art really gives you a stronger foundation as an artist with your paintings, drawings, sculpting etc.

When I teach a workshop much goes into prep for the class and I stress how important it is to set up an area and be ready to make art. I hope you will go ahead and do that if you do not have an area.  This first lesson is using only two things.. a pencil and a sketch pad. Nothing more or less tool wise, but add to it your eye and learning composition and line and we will jump right in.

There are seven elements in art. Every time I teach a lesson, you need to figure out what elements we are using in that lesson. This first lesson is on something simple, "line".  We are going to do a contour drawing...actually I hope you will do them for a few days.  Find something in the room to draw and pick up your pencil and begin.
  

BUT... you cannot look at your sketch pad and you cannot lift your pencil. The line is ONE CONTINUOUS LINE.  You start and when you stop or lift your pencil you are done.  No cheating and no looking at your sketch pad or you defeat the purpose of strengthening your eye and 'feeling' your way through a drawing. No erasing, no looking...only one continuous line. Start to stop. You can go soft, hard, or in between but you cannot look or lift your pencil.


This first one was drawing my mug of paint brushes in my studio. I knew it would be both fast and fun.  This is suppose to be fun. 


This was of my easel and quite a bit harder.  Then I spotted those paints and my paper palette. I pulled my chair close and put the pencil to the sketch pad.


This should be quite freeing to you. Sketching fast is totally different than one continuous line.  You hand is moving and NOT looking at anything but the object you are drawing. You are after the CONTOUR of what is there. You are studying LINE.  Good luck with yours and let me know how you are doing. This will be the first time I use the InLinkz Link up.  

So please join me by sharing yours. 


An InLinkz Link-up


 A Texas Artist
 Laurie Pace

http://ellepace.com

Sunday, September 8, 2013

Coming Soon! Art Lessons with Laurie Pace

COMING SOON... Art Lessons will be appearing!  Join me when you can... we will start once a week starting this coming Thursday.


Thursday, September 22, 2011

Chalk and Buttermilk Art Lesson Paul Klee by A Texas Artist Laurie Pace

CHALK and BUTTERMILK and Paul Klee by A Texas Artist Laurie Pace

As you can tell the inspiration for this lesson would be Paul Klee's work...and I have only named two but there are many.


This first image is "The Red Balloon" painted by Swiss Artist Paul Klee.  His works on paper have a light hearted whimsical look and are radiant in color. His balloon even seems to defy gravite.

While his works seem whimsical, it is rooted in deep thought. When he portrayed a wide-eyed cat sitting back observing a bird in a powerful way, Hitler was in power beginning to ponder out his own prey.


Take time to research some of Paul Klee's work before beginning this lesson.


While contemplating Paul Klee's work, point out to your students how he covers the entire paper he is working on. He uses the full surface.


Vocabulary:  Chalk, Buttermilk, filling space, color choices, shapes
Subjects to consider: Circus, Masks, Balloons, Self Portraits, Parades

Supplies: 
Buttermilk           Chalk in all Colors (discards if you have them)    
Manilla Paper or heavy paper that stands up to 'wet' at least 12 x 18 in sizes Newspaper        
Clean up Buckets filled with water   Sponges, Paper Towels  

Optional Paint brushes for those not wanting to get their fingers gooey or wet.

Before beginning have each student discuss what they will create on their composition... a cat, a mask etc.  Then have them think about the colors they want to use. Have them choose most of their chalk (colors) and put them in their work area.  Have newspaper spread across the area for each student.

Place paper on the students newspaper.   Pour a puddle of buttermilk about two inches in diameter in the center of the paper.  Have the student spread the buttermilk out with their hands quickly. It dries fast. You can add more buttermilk if needed.

First the student will use chalk to draw out the main focus of their work...for example a cat, or a balloon or a mask.  Have them begin filling in color mixing and rubbing the chalk into the wet buttermilk surface on the paper.  If the chalk colors do not mix with the buttermilk, that area that dries with out color are dark and dirty.

Make sure the student fills every area of the paper with colors using their chalk.  (The chalk should be washed and rinsed in water once this lesson is complete...or thrown away.) 

Be prepared for a mess to clean up, but the finished works are incredible.  Send me  pictures of what you do....A Texas Artist

Laurie Pace


Monday, September 19, 2011

Sketch Books are a Must!

Sketches in every Moment for the old and the Young!


Sketching is essential to capturing events and things around you all through the day.  I like to write on my sketches the date and thoughts I had to make me want to sketch away.

My first suggestion to you is to always have a small sketch book in hand.  

I remember when we traveled to New York for the first gallery show of the Five Graces, Conni Togel had her sketch book in hand at all times and in most places.  It was valuable for me to realize that as an artist, it is a tool I need all the time.

You can find them small or mid-sized. The smaller ones will fit in your purse or backpack and not take up much room.


 This is one of my favorites and it is available on Amazon.  It is only 3 x 5 inches in size.

Moleskine Small Sketch Notebook

Technical Details

  • For drawings. 80 pages of fine quality white paper. Imported from Italy. 3" x 5"
  • Purchase in quantity today to best build your Moleskine bookshelf. The future is unwritten. Take up your pen and shape it.
  • Each Moleskine has a rigid, oilcloth bound 'moleskine' cover, and the acid free paper pages are thread bound.
  • They also have an elastic closure and an expandable inner note holder made of cardboard and oilcloth and a removable card with the moleskine history.
  • A great way to get things done! Pocket-sized - junk your PDA!

Friday, May 9, 2008

First Lesson

TAKE A BITE OUT.... Try it you might like it!

MAKING ART

Lesson One The Chocolate Chip Cookie

Recipes are wonderful for the cook in the kitchen. Recipes are wonderful for artists as well.
Beginning artists must first learn though that the ingredients in are are quite a bit different than the ingredients in a regular recipe.

If you buy a cookbook it is filled with recipes from everywhere. Usually with every recipe there is an ingredient list for shopping. When you go to the supermarket you walk in and face literally millions of ingredients that can be used in recipes.

Art is similar but strangely much simpler. There are only seven main ingredients in art.
I usually teach this lesson with Children and we make chocolate chip cookies.


I ask them what goes into making the cookies. They tell me eggs, flour, sugar, salt, butter.... the normal things that are in cookies. I have everything out on the counter, premeasured and ready. We also talk about other recipes, like what might go into Meatloaf, or a cake, or into pancakes. We talk about how different foods have different ingredients and how they all taste different, but use some of the same things in making them; and how they all look different too despite having the same ingredients.

They take turns adding different ingredients and we stir them together watching how they change as they blend.


Then we take turns scooping out the cookie dough onto the pans. Of course every one has one extra spoon to take a bite of the creamy cookie dough.


I slide the cookie sheets into the oven and we begin to talk about art now as they bake.


The finish is milk and cookies for the rest of the lesson.


In art there are only seven ingredients. Unlike the grocery store with all those items stacked ceiling high, art only requires seven main elements. They are line, shape, space, color, texture, form and values. Only seven. Now there are other things that will play into the development of these seven but for the first intro to art, lets just talk about these seven things. In future lessons you will be asked to use these elements. As we progress into other art projects and lessons you will need to be able to identify what elements are in that particular piece of art.

Line

Line is the path of a moving point. Lines define the edges of shapes and forms.

Shape

Shape is an area encolsed by line. It is 2 dimensional and can be geometric or organic.

Form

Forms are three dimensional. They occupy space or give the illusion that they occupy the space.

Color

Color is the most expressive element of art and is seen by the way light reflects off a surface.

Value

Value is the lightness or darkness of a surface. It is often referred to when shading but value is also important in the study of color.

Texture

Texture is the actual surface feel of an area of the simulated appearance of roughness, smoothness or many others.

Space

Space is the illusion of objects having depth on the 2-dimensional surface. Linear and aerial perspective are used.


I will leave you to ponder these seven elements! Look through magazines now and see if you can find examples of Line for our next lesson. Clip out the picture and paste it in your sketch book. We will have our next lesson on "LINE". Have your sketch book ready, markers, pencils, what ever you like to make lines with...charcoal, anything. Just a simple lesson to introduce you to line.

from my heART to you.
Laurie

Supplies: Next lesson have your sketchbook ready with your example of LINE glued into it. Have something to make lines with too.

Share Art Lessons by Texas Art Teacher Laurie Pace